Module 4
Plugins and Side Applications
Go Back to
the Main Menu
1. About the
plugins
1-1:
Installation and activation of the Axicon Verifier software
plugins.
The object of barcode verification is twofold. Firstly, to ensure the barcode print quality is good enough for readability first time every time. Secondly, to ensure that the barcode data and structure is correct for the particular symbology and application. AXICON ISO/ANSI barcode verifiers always aim to achieve both criteria. Not only do our verifiers perform a full print quality assessment according to the most stringent international standards but, thanks to an extensive range of plugins and additional programs, we can also validate the data content of many specific barcoding applications.
What exactely is a plugin?
A plugin is an additional application that when required, will be performed when activated in addition to the print quality assessment. It can be:
:
-
An application standard data compliance
check, like the "French pharmaceutical vignette" plugin which when activated, will check all code 128 barcodes to ensure that the data structure complies with the French pharmaceutical requirements (Code length, check digit etc...). A code 128 intended for a pharmaceutical vignette could have a perfectly good print quality but a faulty format. The grade would be good , however, the Plugin result would display an error message.
-
A field for additional
information, like the User Data plugin, which allows you to add various relevant data to the anlaysis and save this data with the scan file.
-
A link to another
software, like the Product Lookup plugin which allows you to connect the scan result to a product database and display the name of the product being scanned.
-
etc...
How does it work?
To get a plugin to work, it must be both installed and activated.
How do I install a plugin?
1/When you first install the software:
Some plugins are installed by default; all others are contained in the “Extras” directory on the CD-ROM. Click on “Install Optional Plugins” from the Autorun welcome screen and follow the instructions.
2/When updating your list of plugins to the latest upgrades and
additions:
You can either choose to download the latest version of the “Extras” folder from the “Download page” (Zip
file), this contains not only an exhaustive list of plugins but other programs and utilities as
well. Alternatively, you can handpick the relevant plugins from the “Download Plugins” page. Option 2 is the fastest if you know which plugins you need. Once you have made your selection, you need to copy them onto your PC hard disk in the same folder as verifier.exe. By default the access path is C:\Program Files\Axicon\Verifier.
How do I activate/deactivate a plugin?
You need to run the Verifier software, open the “Setup Screen” and go to the “Plugins” option. There you will see the list of plugins. Tick the box to activate or untick to deactivate. For some plugins you can also access a configuration screen by clicking on the plugin when activated and then on the “Configuration” tab.
Which plugins should I activate?
We strongly recommend that you only activate the plugins as and when they are needed, otherwise you will
receive irrelevant or confusing information. For example, if you scan a French pharmaceutical Vignette code, you should activate the “Vignette” plugin. If you activate the “Vignette” plugin and never scan such codes, the plugin results will be displayed each time a Code-128 is scanned giving validation data irrelevant to the scan causing possible confusion to an inexperienced operator. If you need help on this subject, please contact us.
Where can I see the results of the plugins?
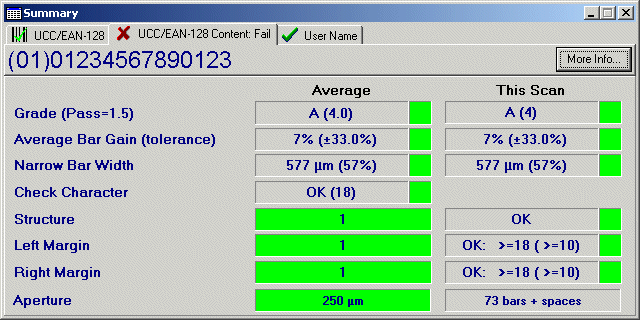
At the top of the “Summary” window there is a tab displaying the name of the plugin with either a red cross for wrong data content or a green tick if it is correct. Click on the “More info” tab on the right of the screen for a display of the full plugin results.
1-2:
Plugins Table
Click on the plugin name to download.
| Name |
Application |
Description |
| AIAG |
Automotive |
Displays and validates data
content of both Code-39 and Code-128 barcodes used in the automotive
industry, including Odette.
|
| AI
Check |
All |
Validates Application
identifiers (AIs) and data structure content for both UCC/EAN-128 and
RSS.
|
AI
Check French
AI
Check German
AI
Check Dutch (nld)
AI Check Spanish
|
All |
Translation files for AI Check. Languages
currently available: Dutch, French, German and Spanish.
|
| Aus
Var Weight |
Retail |
Displays in-house product, 5 digit price and validation
of both check digital (displayed on variable quantity eg cheese and
meat products) Unique variant to cover the specific requirements of
the Australian and the New Zealand markets.
|
| CIP
39 |
Pharmaceutical |
Validates French
pharmaceutical code for data length and check digit.
|
| Code39
ASCII |
Automotive
Pharmaceutical |
Decodes full ASCII Code-39 barcodes.
|
| Code
Vignette |
Pharmaceutical |
Validates French pharmaceutical Vignette code,
checks refund rate, check digit and structure as applicable since 01/07/2003.
|
| Code
LPPR |
Pharmaceutical |
As above for products
included in the Liste des Produits et Prestations Remboursables.
|
Coupon
Codes
Euro
Coupon
UK
Coupon
US
Coupon |
Retail |
Displays information on
issuer, coupon number and value (Euro and UK) and provides
information on manufacturer, family type, purchase requirement and
value.
|
| HIBC |
Pharmaceutical |
Health Industry Barcode.
Validates both primary and secondary HIBC symbols. Check date
indetifier and structure of data content.
|
| ISBN/ISSN |
Publishing
Retail
|
Displays ISBN or ISSN
number for publications with correct hyphenation, also displays
price details for books and issue details for magazine.
|
| Italian
Pharmacode |
Pharmaceutical |
Otherwise called IMH code,
C39 Pharmcode or Base 32 Code. Validates code structure and
translates it into standard format.
|
| Job
Reference |
All |
Allows a single line
reference for ISO traceability and spreadsheet information; forms
part of the printed report.
|
| Lookup |
All |
Link to an existing
database to show (and print) description of product along with
quality control information. Please see Text Lookup below.
|
| M&S |
Retail |
Gives details on instore
reference, supplier code, GTIN, quantity and check digit on 20 digit
M&S transit labels.
|
| MSI
Plessey |
Pharmaceutical |
Otherwise called belgian
Pharma Code. Validates code structure and format.
|
| PZN |
Pharmaceutical |
German Pharma Code. Validates code structure and format.
|
| SISAC |
Publishing |
Displays expanded version
of the data incorporating: ISSN, Chronology enumeration/supplement
and all other details
|
| NL_Internal |
Retail Netherlands |
Checks data on instore codes (eg: variable wheigt with
the price or the wheight shown, etc...) as specified by EAN
Netherlands.
|
| Text
Lookup |
All |
Specially designed for
.csv and .txt databases. Several copies of the Lookup plugin can be
installed if the user needs to refer to multiple database for two or
more fields within a single database.
|
| Time
Zone |
All |
Records the time zone
setting of the PC where the scan is made.
|
| UB
Pharm |
Pharmaceutical |
Belgian Pharmacode
|
| UPC |
All |
Displays zero suppressed
version of the UPC-A number (i.e 12 digit only)
|
| User
Data |
All |
Allows multiple job
referencing: relevant information can be appended to a scan. this
can be exported to a spreadsheet using Scan DB Extractor and saved in
CSV format. Particularly suitable for undertaking audits in
manufacture and retailing.
|
| User
Name |
All |
Automatically displays
network user logged on at time of scan; ideal for ISO9002
procedures.
|
| Var.
Meas. Branded |
Retail |
Non in-house variable
product, displays a 4 digit code.
|
|
Var.
Meas. Instore |
Retail |
Displays in-house
producta, 5 digit price and validation of both
check digit (displayed on variable quantity e.g. cheese and meat
products.).
|
| Warning:
Obsolete Plugins
|
| EAN
128 |
All |
Has been replaced by an
improved plugin, the AI Check.
|
| CIP
128 |
Pharmaceutical |
Has been
replaced by two improved plugin, Vignette and LPPR.
|
2.
Key features
In this chapter we will provide in depth information on some of the most useful plugins and how they can help you to improve your overall barcode verification procedures.
2-1:
AI Check - plugin
AI Check stand for Application Identifier
checker. This plugin comes with the Axicon xx15 models and should
always be activated when scanning either an EAN/UCC-128 barcode or an
RSS barcode, because both symbologies use Application Identifiers (Not
on all RSS symbols though).
The aim is to validate
that the code structure and the symbol comply with the GS1 rules as
specified in the General Specifications. This is an application
standard compliance check.
Comments:
In the example below, note that the ISO grading is an A (4.0), which
means that the print quality is good, however the UCC/EAN-128 Content
gives a Fail, which enphasizes that the data content is faulty. This
code even though it has an excellent ISO grade should be failed.
Barcode quality control is not just about the ISO grade, a lot of
other factors are involved, this is why it is important to use the AI
check plugin when scanning an EAN/UCC-128 barcode.
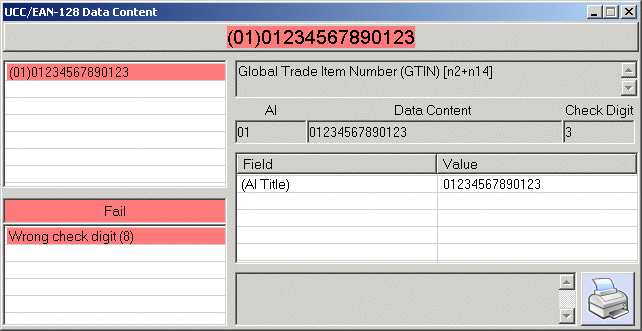
Click on the more info button to open the dedicated AI check plugin display window. All the Ais of the barcode are listed, the faulty ones are in red. There are several panels in the window which provide comprehensive information. In the example below, only one AI is actually displayed. Here the check digit of the GTIN encoded with the application identifier (01) is 3 but the real value should be 8, hence the data is faulty.
Case
Studies:
 |
Case
Study 1: A typical encodation error, where the brackets,
used only to identify the application identifiers in the human
readable, have been encoded in the barcode. The brackets are
never encoded. They can only be used in the human readable. |
 |
Case
Study 2: This barcode is made of AIs (02) the GTIN and
(37) the quantity of units with this GTIN included in the
logistic unit labeled with this barcode. The Check digit of the
14digit long GTIN is faulty. This is a data error and the AI
check fails this particular AI. |
 |
Case
Study 3: Contrary to case N°2, here it is the symbology
check digit that is wrong, therefore the ISO grade is an F. No
problem with the data content. |
2-2 Product Lookup -
plugin
The Axicon PC verifier range (Axicon-xx15 only) can perform
Product Lookup. This means that when you scan a barcode, it
displays not only the decoded number and the details of the quality of
the barcode, but also the description of the product to which that
barcode applies (or 'Not found', if the item does not appear in the
database).
Installation of Database
32-bit Product Lookup is only available in
conjunction with version 2.0.2.9 (or later) of the software. If you
have an earlier version, please contact your supplier for a
free-of-charge update. This is supplied on CD-ROM, or as a set of
floppy disks on request.
Install the verifier software, making sure to tick the Lookup
option. This also installs the Borland Database Engine (BDE), which is
required for Product Lookup to operate.
Please read through this complete section thoroughly before
setting up Product Look-up, as setting up the database incorrectly can
cause problems.
Configuring Your Database
You can reach the Lookup configuration window thus:
- From the 'Options' menu, choose 'Setup...',
or press the F5 key
- Choose the 'Plugins' tab
- Select 'Lookup' in the list of installed plugins to the left
- Press the 'Configure' button
The ‘Database’ tab contains controls to select a database, as
described later in this section.
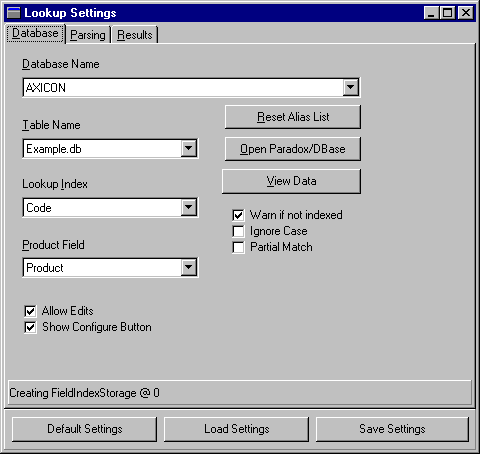
The default database is the sample database, supplied by Axicon.
You can use this database as described in ‘Method
1’ later on in this section.
‘Open Paradox/DBase’ opens a Paradox or DBase file directly, as
described in ‘Method 2’.
‘View Data’ displays the data in your database. Before making
any changes to your data, you must click the 'Edit Database' button.
The second tab ‘Parsing’ is used to determine which portion of
the bar code number is looked up in the database.
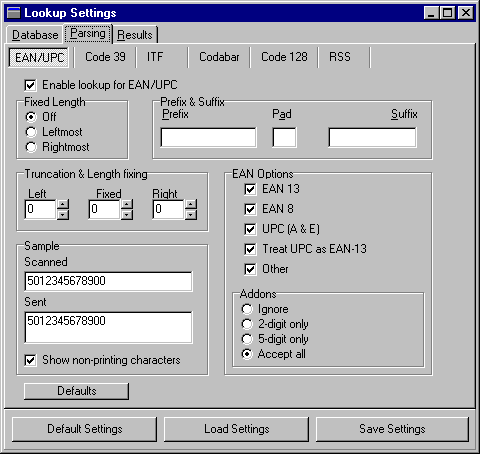
The options for each symbology
are independent. There are also some EAN/UPC specific settings, which
appear only on the EAN/UPC tab. Using the controls on this tab, you
can select that product.
- Prefixes and suffixes data with fixed data before using them to
perform lookup.
- Left or right-justifies data in a fixed length field, padding
with any character.
- Ignores add-ons of EAN/UPC codes
- Ignores any or all of: EAN-13, EAN-8, or UPC codes.
For example, to use a product identification number within an EAN-128
bar code:
- Click the 'Code 128' tab button
- Switch fixed length to 'left most'
- Set format to a left truncation of 3 and a fixed length of 14.
For lookup purposes the verifier will now ignore the first 3
characters (F1 and application identifier) and look up the next 14
digits in the database. The quality of the entire code will, of
course, still be verified.
Note that this will only work if the product number is the
first Application Identifier within the code.
The 'Sample' panel displays the effect of the current settings. The
'Sent' field shows what would actually be searched for in the
database, if a code containing the data in the 'Scanned' edit field
was scanned.
Once you are happy with your settings, click on 'Save Settings'. If
you do not save your settings, they will be lost when the verifier
software is closed. The ‘Default settings’ button resets the
product lookup to factory default settings.
The third tab, ‘Results’, allows you to select the action taken
upon finding or not finding a result in the database, and what
information about the database, including the database, table and
field names, is displayed in the Verifier. The text of the 'Not found'
message is also on this tab.
Setting Up and Using Product Look-Up
The Axicon PC verifier range can connect to databases in three different ways.
Method 1 (Using the supplied example
database)
The PC Verifier software installs a simple example database. If you
do not have a product database already available, this is the easiest
method of using Product Lookup. If you do modify the example database,
be sure to back it up before un-installing or re-installing the
software, otherwise your data may be lost.
Some sample codes have already been set up for you, and you can try
these for yourself:
Start the verifier software (and remember to calibrate the verifier
if you have not already done so). Now scan the EAN-13 bar code on the
bromide calibration sheet and the verifier will display the decoded
number. Along the top of the Summary
window, a tab with the description ‘Lookup’ will appear (if
Product Lookup has been installed and the correct password entered).
The ‘Lookup’ tab should now contain the description ‘Sample EAN
barcode’. This description is taken from the sample database. The
‘More info...’ button located to the right-hand side will display
the database, where you can add in your own records if yrequired.
You can also reach the ‘Lookup Settings’ window via the
'Configure' button on the Plugins tab
of the Setup dialog. To view your data from
here, select the ‘Database’ tab, and click ‘View data’.
To add your own products to the database is very easy:
- Click the 'Edit Database' button
- Click the ‘+’ button to insert a new blank record into the
database
- Click in the ‘code’ field, and type in the barcode number
- Click in the ‘product’ field, and type in the description
- Click the tick button to confirm the entry
Now close the Lookup window, and scan the bar code for this
product. The verifier will now respond with both the decoded number
and the description (in the ‘Lookup’ tab).
This process is simplified if you have the bar code physically with
you. Simply verify the barcode, click the ‘Lookup’ tab in the
summary window, and press ‘More Info...’. The database will be
shown, and a dialog box will ask you whether you want to insert a new
record. If you choose ‘yes’, the barcode number is automatically
entered in the ‘Code’ field, and you need only enter the
description.
If you now clear the data and scan the bar code again, the
description will appear on the Lookup tab.
To set up further databases or to link to different databases use
the Lookup settings window (as described above). From here you can
alter the database settings.
Making a Single Paradox IV Database Accessible by Two or More
Users
Whenever a database is in use by more than one user, there is a
possibility that two or more users may attempt to update the database
simultaneously. For databases which are accessed via a database server
(e.g. SQL server), the server deals with this kind of contention.
However, for databases accessed by means of shared files, such as
Paradox files, some other means of arbitration between users is
required.
Access to Paradox IV files by multiple users through the BDE is
controlled through a shared file, PDOXUSRS.NET. A single copy of this
file must be accessible to all users of shared Paradox databases, and
the location of this file must be set manually, as follows:
- It is usually easiest to place the PDOXUSRS.NET file in the same
location as your database files, and the following instructions
assume this. Be aware that this location is common to all software
on the computer that uses the BDE to access shared Paradox files.
- Make sure your Paradox IV database file is in an accessible
network location, either on a file server, or in a shared network
folder. If you copy the files, make sure to copy both the '.db'
(database) and the '.px' (index) files.
- Ensure that the PC Verifier is not running on any of the of the
computers from which you need to access the shared database. Then,
follow this procedure on each computer in turn:
- PDOXUSRS.NET must be accessible via a drive letter. Thus, if
you are using Windows networking, you must ensure that a drive
letter is mapped to the location of your shared database
files.
- Ensure that the Verifier has been installed on the computer,
including the Product Lookup option, which will install the
BDE.
- Open the "BDE Administrator" control panel.
(Settings | Control Panels | BDE Administrator)
- Select the 'Configuration' tab. Double-click on
‘Drivers’ to expand it, double-click ‘Native’
likewise, and finally click on ‘PARADOX’ to select it. You
will now see a window which looks like this:
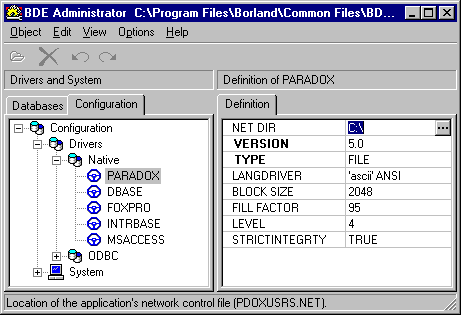
- In the right-hand definition pane, there is a line ‘NET
DIR C:\’. Click on this line, and a button containing three
dots will appear at the end of the line. Click this button and
select the network drive and directory containing your
database files. This sets the location of PDOXUSRS.NET.
- Now re-start the computer and start up the verifier
software. The process of doing this will create the
PDOXUSRS.NET file, if it does not already exist.
- Close the verifier software.
- Move to the next computer and repeat this process
Method 2 (opening a Paradox or DBase file
directly)
The verifier can open DBase (.DBF) and Paradox (.DB) database files
directly.
- Using your existing database program, save the data to a DBase
or Paradox file, if it is not already in this format. If possible,
you should generate an index on the field which contains your bar
code numbers.
- Start the verifier software.
- Click the 'Configure' button, on the Plugins
tab of the Setup dialog.
- You will see a window named ‘Lookup Settings’ with three
tabs named ‘Database’, ‘Parsing’ and ‘Results’. Choose
the ‘Database’ tab.
- The first line ‘Database Name’ shows the ‘alias’ name
assigned by the BDE to the database in use. It can also display
the directories in which your database files are located, if you
have already used the 'Open Paradox/DBase' button.
- Click the ‘Open Paradox/DBase’ button, and select the
database file to use. 'Database Name' will be set to the directory
path, and 'Table Name' to the file name.
- Choose the name of the field containing the bar code number from
the 'Lookup Index' drop-down list. If the database is not indexed
on the selected field, a warning will appear now and every
time this database is opened in the future. You can disable this
warning by unchecking the 'Warn if not indexed' check box.
However, if your database is large or accessed via a network, you
will find that product lookup works faster if this field is
indexed.
- Choose the field containing the description from the 'Product
Field' drop-down list
- Click the ‘Save Settings’ button
- Your database is now ready for use
Method 3 (access through a BDE alias)
The Axicon Verifier can also link to many other types of
database, including Microsoft Access, plain text files, CSV format,
SQL, or any database for which you have an ODBC driver. It does this
through a BDE alias, which is effectively a link to a database.
This is not as straightforward to set up as the previous options,
but offers the most flexibility in interfacing with existing data
sources. If you do choose this option and encounter problems, Axicon
can provide a consultancy service to assist you.
For ODBC data sources, this software should be used in conjunction
with the 32-bit ODBC server only. It is not compatible with the 16-bit
version.
The Setting up and linking of the database is in two sections:
Setting up the BDE Driver and Alias
- a. Smile and take a deep breath, It's always good before commencing this sort of excercise.
- Open the "BDE Administrator" control panel. (Settings
| Control Panels | BDE Administrator)
- It will display a window with several tabs. Ensure that the
‘Databases’ tab is selected.
- Choose 'New...' from the 'Objects' menu.
- A dialog containing a drop-down list of the available database
drivers will appear. Choose the appropriate driver for your
database from the list, and click 'OK'. The 'STANDARD' driver
works for DBase, Paradox and FoxPro database files. For Access
(.MDB) files, use the MSACCESS driver. If you have any ODBC
drivers installed, they will also appear in this list.
- The alias name of the new database will be automatically
selected for you to name as required. This is the name by which
this database will be known in the verifier software. You can also
rename it later by clicking the name here and typing.
- The definition of your new database alias will be displayed in
the right-hand pane. Now, you must associate this alias with your
database file. The exact procedure for this depends on the
database driver you selected.
- For the MSACCESS driver, click on the ‘Database Name’
row, click the button showing three dots that appears at the
end of the row, and choose your database file.
- For the STANDARD driver, click on the 'Path' setting, and
click the 'three dots' button to choose the directory
containing your database files.
- Other drivers work in a similar way. Exact instructions for
all possible ODBC drivers are beyond the scope of this
document.
- Now save changes and close the BDE Administrator. For further
information on configuring BDE aliases, consult the BDE
Administrator help.
Setting up the Verifier
- Start the verifier software.
- Click the 'Configure' button, on the Plugins
tab of the Setup dialog.
- From the 'Database Name' drop-down list, choose the alias name
you just created in the BDE Administrator.
- Select the correct file from the 'Table Name' list
- Choose the field containing the bar code number from the 'Lookup
Index' drop-down list
- Choose the field containing the description from the 'Product
Field' drop-down list
- The ODBC server may request a user name and password. These can
normally be left blank.
- The database is now ready for use.
2-3
Scan File Data Extractor - side application
The Scan File Data Extractor is a utility designed
to enhance the capabilities of the Axicon Verifier software. In particular
it assists with the process of summarising and reporting on analyses made
with the verifier as part of quality control procedures. The Scan File
Data Extractor makes use of scan files, saved with a .scn extension, that
have either been manually or automatically saved by the Axicon Verifier
software after having verified a bar code symbol. It is therefore possible
for a quality manager, for instance, to inspect scans made by an operator
from a particular shift, or even from a remote site over the period of
a week or month, in order to monitor print press performance and bar code
quality. If the Axicon Verifier has been set up to automatically save
all scans, a complete audit trail can be kept, and the Scan File Data Extractor
is the tool which enables this audit trail to be examined.
The Scan File Data Extractor records the results
from the scan file in a database. Scans can be imported into the database
manually by selecting the import function from the file menu. It is possible
to import a whole folder of scan files, or just a selection, in one import
process, simply by selecting all of the files that are required. Alternatively
the process of importing scan files into the database can be automated,
by configuring the Axicon Verifier to perform this at the time that
scans are saved.

Imported scans are displayed in the table of records.
Each row contains data from one scan file, and each column contains a single
item of data from the scan file. If scans have been saved with additional
plugin data, this information is displayed in its own panel below the main
table. The table can be sorted on certain fields to make locating a particular
scan easier when the table contains many scans, and it is also possible
to see more detail about an individual record by selecting Display Scan
from the file menu, or clicking on the PC Verifier icon  . .
This will launch the Axicon Verifier software (if it is not already running), and will open the scan for viewing in that application.
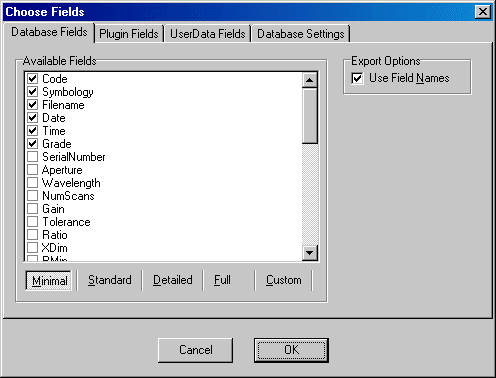
The table itself can be extremely useful for viewing the complete data related to all scans that have been imported, however, when generating a report from this data it is likely that only some of the data will be required. In order that this data can also be used in other applications such as Microsoft Excel, it is possible to export chosen fields of data from the table to a CSV (comma separated values) file. This is done by selecting Choose CSV fields from the options menu. It is possible to select whatever data fields may be required and it is also possible to choose whether or not plugin results are also output to the CSV file by selecting the plugin fields tab and ticking the appropriate plugin. Having selected the data required for the CSV file, this data can then be stored in a CSV file format by selecting Save CSV from the file menu and it is possible to see the output format for this file in the panel beneath the table if the CSV preview tab is selected.
Data can always be added to the table by importing
more scans. It is possible to clear the database completely by selecting
the appropriate option from the options menu if a fresh start is required.
Individual records can also be deleted from the database by selecting the
record so that it is highlighted and then clicking the  button.. button.. 2-4
Laetus Pharmacode Verification - side application
The Laetus pharmacode is mostly used on drugs packaging for internal use, to check in the production line that the right drug or the right instructions are placed in the right packaging. It is never read at the retail point (i.e in a pharmacy) and is usually printed on the folding end of the packaging that is concealed when the packet is closed. It is not a type of barcode that can be checked by the standard Axicon Verifier program because you can’t autodiscriminate a pharmacode. There is no start pattern to identify Laetus pharmacodes and no decode algorithm, therefore, they cannot be subject to the ISO print quality verification. So we have built an additional program to perform some basic checks such as the read and inverse read, dimensional accuracy (against the Laetus standard), product lookup with a product database to check that the code scanned matches the product description.
To perform the scan of a Laetus pharmacode, you have two options, either use a standard red light verifier (the Axicon 6015 is the most appropriate) or use a special white light verifier (the Axicon 6000W white light verifier).
The advantage of the red light option is that you can verify all the barcodes of the packaging (laetus and product code), but the limitation is that you can only check pharmacodes with dark bars. This can be the best solution if the company only prints dark bar Laetus, but in the case where yellow or red bars are also printed, then the only available solution is the Axicon 6000W white light verifier. The Axicon 6000W can read all barcodes but can’t produce an ISO grading because the light wavelength is not the one specified in the standard.
DISCLAIMER
This document is intended as a recommendation of work practices sponsored by Axicon Auto ID Ltd. Whilst this document is believed to contain correct information, neither Axicon Auto ID Ltd nor any of it’s associated companies, nor any of it’s employees, make any warranty, express or implied, or assume any legal responsibility for the accuracy, completeness or usefulness of such information that its use would not infringe privately owned rights. Reference herein to any specific commercial product, process, or service by its trade name, trademark, manufacturer or otherwise, does not necessarily constitute nor imply Axicon Auto ID Ltd endorsement nor recommendation. The views and opinions of authors expressed herein do not necessarily state or reflect those of Axicon Auto ID Ltd.
|