Module 1 
Installation, Operating Instructions & Maintenance


Go Back to the Main Menu

1. What’s in the box ? 

Upon receipt of your Axicon verifier, your carry case contents should be as follows:
• An Axicon 6000 or 6500 or 7000 series verifier read head.
• The cable(s) required to connect and power the read head to the PC or Mac.
• The "Axicon Verifier" Software CD. 
• A wallet containing: a calibration sheet, compliance certificates, a maintenance contract card, password access codes (where applicable) and a Quick Start installation guide.

Comments:
1/ The quick start guide despatched with the verifier covers only the installation instructions and some important information. Should a user require more in-depth information, a more comprehensive manual can be downloaded from the Software CD. Also the Software "Help files", provide a great deal of support.
2/ Please retain the transit case and appropriate packaging (for protection in transit) in case you should need to return the unit to Axicon for repair or maintenance 

2. Software: Installation & setup

2-1: Installation for Windows

1. Ensure that your computer is running Windows 95, 98, NT 4.0, ME, 2000 or XP.
2. Insert the CD into the CD drive
3. The Install Program should now start automatically. (If not, open the CD using Windows Explorer and double-click the Autorun Program).
4. Click “Install Axicon Verifier”
5. Follow the on-screen installation instructions for the next four windows (Select a language, Welcome, Software License Agreement and choose destination location) until you reach the “Select Components to install” window below. 


The Scan File Data Extractor box can be ticked if you wish to install this application (more info on this in the module dedicated to plugins). The Online Verifier should not be ticked if the verifier is not used as an online verifier. If you have purchased password-protected features (Application Identifier Checker or Product Look-up) you should tick the check box next to the relevant item and click “Next”. 

6. Click “Next” again to pass the “Select folder in start menu” window
7. If you have selected any password-protected features you will now be prompted to enter your serial number and passwords. The description appears in bold for the features you have chosen to install and the passwords are in the enclosed wallet. 
If you have more than one verifier with password protected features you should enter the serial number and passwords for the first unit, then click “Enter Another” to enter the serial number and passwords for the additional verifiers. 
Click on “Next”
8. The software will now be installed. 
9. If your verifier is USB connected, please leave the CD in the PC in order to install the USB drivers.

Comments:
1/ Software language: When you select a language at the start of the software installation this is purely for the installation routine and not the language for the verification program which will default to the selected language version of Windows on your PC. Should this language not be available in the translation files, then English will be the default language. Should you wish to change the language of the verifier, under the "Start" menu of Windows, go to Program Files, then Choose "Axicon Verifier" and then "Set Language". This will open the "Language Selection" dialogue box, click on Verifier.exe in the central panel, and in the right panel, choose one of the languages and click on the "Set" button. As English is not a translation file simply click on the "Original" button.

2/ Upgrading the software: The latest copy of the software is always available on our website (www.axicon.co.uk/download.htm). To install an upgraded version, please download the setup file from the website and then double click on the "setup.exe" file to start the installation procedure as per above. The new version will install itself over the previous version, so you don't need to delete the prior version first.

3/ When installing the software, make sure you have the relevant level of access to do so. The administrator password might be required, particularly in larger organisations when running on a network. In this case the software has to be installed on each station where the verifier will be used.


2-2:
Installation for Apple Macintosh

1. Insert the CD and double click on the CD icon
2. Install USB Driver by double-clicking the USB Driver* icon. This operation will require an administrator password. Installer will prompt you to restart your Mac after it has installed the driver.
3. To install the Verifier application, drag the icon to your selected location .
4. To run the application double-click the Verifier icon. 

* If you are using OS X 10.2 the text “You cannot install this software on this disk (null)” may appear. If it does, click the “Go Back” button and then the “Continue” button again and the driver should install.

3. Hardware: Installation, USB drivers, cables

3-1: Connecting/disconnecting cables from the verifier

It is important to connect and disconnect the cables from the verifier with a lot of care, otherwise a cable could easily be damaged and prevent the verifier from working properly.

Axicon 6500 & 7000 Series. The cable is delivered un-connected. 
To connect, plug the round 12-pin metal connector into the verifier. To do this accurately, please note that on both ends of the connection, some numbers are written to help you guide the cable inside the connection so that the pins match exactly. 
Disconnecting, care is required to ensure no damage is caused to the cable. Pull the cable away from the verifier by holding the aluminium ring of the cable, you will feel the spring latching system and the cable will pull off easily.

Axicon 6000 Series. The cable is delivered already connected. 
Disconnecting: Although not normally necessary, use an unfolded paper clip and insert it in the small hole at the bottom of the upper part of the handle, this will unlock the "telephone type" connector within the handle.

3-2: Installing a verifier with USB connection

1. Plug the verifier cable directly into any available USB port on the computer.
2. When prompted to install the drivers, make sure the CD is inserted into the CD drive and follow the instructions.
3. A message confirming that the hardware installation has completed should be displayed. You are now ready to use your verifier.

Comments:
1/ If you fail to install the drivers, then not only you will not be able to operate the verifier but it is also likely that when you plug the verifier to the PC, the dialog box to install the drivers does not appear again. So you have to proceed with the installation from the Hardware tab of the System Properties dialog box of Windows, first making sure that the verifier has been connected. In the device manager, you should see a yellow question mark next to the unidentified Axicon verifier under the Universal Serial Bus section. Proceed with installing the drivers from there (make sure the CD is in the CD drive) This should complete your installation.

2/ If you install another Axicon verifier on the same PC, then you will need to repeat the drivers procedure once more to establish which drivers should be used with this new verifier. Even though the drivers have already been installed in the PC, you might find it easier to use the installation CD again as the source for the drivers.
3/ On the Axicon 7000 Series, the above mentioned 12-pin metal connector is the 3rd generation of 7000 cables, and has been in use since mid 2003. Previously 2 different types of cable existed : Generation 1 being a basic 9 pin, push in black connector and Generation 2 a push and twist black cable.

3-3: Installing a verifier with a serial RS232 connection

Axicon 6000 Series – serial with power lead 
1. Switch off your PC.
2. Connect the Axicon Verifier cable to a free serial port.
3. Unplug the keyboard cable from the back of the computer.
4. Plug the verifier power lead into the keyboard socket. 
5. Plug the keyboard into the appropriate socket of the power lead. The power lead should now run between the keyboard plug and the keyboard socket. 
6. Plug the power jack into the socket on the verifier cable. This socket is located next to the 9-pin serial plug. 
7. Restart your PC.

Axicon 6000 Series – serial with Axicon* 5V external power supply

1. Switch off your PC.
2. Connect the Axicon Verifier cable to a free serial port.
3. Plug the power jack into the socket on the verifier cable. This socket is located next to the 9-pin serial plug. 
*Use of a non-Axicon approved power supply will invalidate the warranty as voltage, current and polarity are all critical to the correct and reliable operation of the verifier. 
4. Restart your PC.

Axicon 6500 & 7000 Series
1. Switch off your PC.
2. Plug the round 12-pin metal connector into the verifier. 
3. Connect power lead / power supply as for the AXICON 6000.


4. Activate & Calibrate the verifier

Once the software and if required, the drivers, have been installed, the verifier is ready to operate and you can commence scanning barcodes. With the verifier connected to the computer, start the verifier software by double clicking on the desktop icon (on PCs).

4-1: The Reader Info window

If you have only one verifier connected, then the command window of the software will open and the message "Reader xxxx activated" will be displayed, where "xxxx" is the 4 character serial number of the verifier (also printed on a label attached to the verifier itself). 
If you have more than one verifier connected to the same computer, then the "Reader Info" screen will pop up. On this example below, you have two verifiers connected, both on USB ports. 


Comments:
1/ When you have two verifiers connected to the same computer you will have to use the "Reader info" screen when you start running the program to decide which verifier is activated or to alternate from one verifier to another. 

2/ Troubleshooting: What can occasionally occur is that no verifier is identified and activated when you start the software, even though you have connected a verifier to a serial or USB port. In this case, open the "Reader info" screen and go through a full scan of the ports by holding the "Shift" key and clicking on Enumerate at the same time. This should solve the problem.

4-2: User Calibration

When first using the verifier, the following message will appear:


A similar warning will also appear every time a verifier has exceeded its calibration expiry date. Please click OK and then calibrate the verifier as described below. 
• Please switch on your verifier at least five minutes before you begin the calibration process. 
• To calibrate you will need your bromide calibration sheet, which is located in the wallet.
• Remove the calibration sheet from the wallet and place it on a flat surface. 
• Select the calibrate option.
For Windows versions: This is located in the “Options” menu. "F2" is the shortcut key.
For Mac versions: This is located in the “Reader” menu 
• You will see a window with two edit boxes for minimum and maximum reflectance values. Ensure that the values shown in the window match the values printed at the bottom of the calibration sheet. 
• Depending on the Series of Axicon verifier you are calibrating, choose an appropriate barcode on the calibration card so that the size of the barcode matches the scanning width of the verifier. With the Calibration window open scan the calibration barcode 10 times. Then click the OK button. 
• The verifier is now calibrated and ready to use.

After calibration is completed, store the calibration sheet in its wallet, away from light and physical damage. Should your calibration sheet be damaged or discoloured in any way please contact Axicon or your supplier for a replacement. 

Comments:
1/ Please be aware that clicking OK in the calibration dialog box prior to performing the scans will result in the calibration failing.

2/ During the calibration process the software displays the uncalibrated data and therefore, reflectance values and grades displayed behind the calibration window can be ignored. With effect from version 2.0.19.5 of the software, when calibrating, the grades are no longer displayed. The results will show n/a (for Non Available). It is important to understand that the user calibration only takes into account the values for Rmin and Rmax measured on the calibration card. All the other ISO parameters are measured but have absolutely no role to play in the setting of the calibration values.

3/ If you move your reader from one PC to another then you will also need to calibrate it for the new PC. You must calibrate the verifier for each PC it is used with. 

4/ How often do you need to calibrate ? 
Calibration with known reflectance values is essential to ensure the accuracy of this equipment. It should be carried out after installation and at regular intervals. Under normal operating conditions Axicon recommends calibrating the verifier monthly. In variable light and temperature conditions we recommend more frequent calibration, this also depends on how often the verifier is used and how it is stored. The reader properties will be altered by significant changes in temperature humidity, pressure or if the ambient light at calibration is very different to the one at the verification stage. 

A tip: To monitor your verifier and set up an adequate frequency for calibration, we recommend that after calibration, you make a 10 scan verification of the calibration code and save the results. Then at a later stage, you scan again the same calibration code and check the results against the original ones. If there are significant differences in the percentage values of for example the Symbol Contrast parameter, then the time has come to re calibrate the read head. 

5/ When you install the software, the calibration period is set by default to one month. At the end of this period, when the calibration has expired, the following window will be displayed: 


However you can change the calibration expiration period from the calibration option in the Setup screen of the software. It can be set in days, weeks, months etc. 


4-3: Factory
Calibration vs User Calibration

The Axicon verifiers all use linear CCD sensors to capture scan reflectance profiles of bar codes. The accurate measurement of reflectance across the full width of the scan relies on the bar code symbol being imaged as if the illumination were perfectly uniform and the sensor elements equally sensitive at all points along the scan line. In practice this is not necessarily the case, however, the electronics within the head of these units apply a function that enables the units to perform as if this were the case, so that when the scan reflectance profile reaches the PC or Macintosh computer, the application can make this assumption and proceed with the analysis. To achieve this the heads must be put through a factory calibration process.

This calibration is not the same as the calibration that is performed by the software application on the computer. The "user" calibration that occurs within the application assumes that a uniform profile is already achieved by the scanning head and simply shifts the overall signal so that the maximum and minimum reflectance readings within a scan taken of a known calibration, or reference, test sheet gives the correct readings for that sheet.

After many thousands of hours of use the intensity of the LEDs that illuminate the bar code symbol will gradually change. If this gradual dimming is not completely uniform then a factory recalibration will need to be performed to restore the ability of creating uniform scan reflectance profiles from the scanning heads. If a uniform profile is not being achieved then a bar code symbol may begin to display lower grades, particularly for modulation, than it should really be getting, however, this may not always be obvious to the user when simply trying to verify bar code symbols.

Axicon recommend checking the uniformity of the profile at least once a year and if necessary the factory recalibration can be performed to correct any observed changes from the ideal. To check the uniformity of the profile, please refer to the maintenance paragraph at the end of this module 

5. Operating the verifier 

5.1 - How to handle and position the verifier readhead to catch a good scan line.

The verifier illuminates the barcode and when the switch is triggered, the linear CCD sensors capture the reflected light along the scan line that goes across the barcode. This scan line is not physically visible but it is positioned more or less within 5 to 15 mm from the front of the verifier. See below for more details. It is important to try to keep it perpendicular to the bars to be as objective as possible when grading the barcode.


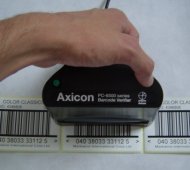
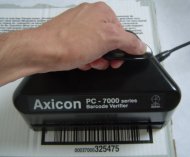
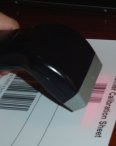
Axicon  6500 Series & 7000 Series

Place the verifier neatly over the surface of the barcode as per the illustration. Make sure the scan line is straight across the code. The scan line is about 10 mm from the front of the unit. Always close the hinged flap at the front of the unit. Press on one of the two switches on the top of the handle to trigger the scan.


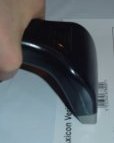
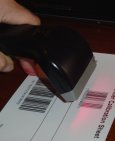
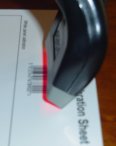
Axicon 6000 Series

Place the verifier neatly over the surface of the barcode as per the first illustration on the left. Make sure that when possible, the 4 corners are in contact with the surface so that you minimise the possible influence of ambient light. Make sure the scan line is straight across the code. The scan line is about 3mm from the front of the unit. Press on the switch located underneath the handle to trigger the scan.

YES

NO

NO

NO

The 4 corners of the unit touch the scanning surface. The barcode is centred.

There must be a contact between the PC 6000 and the scanning surface.

The read head is leaning backwards. The front of the unit is not in contact with the scanning surface

The read head is leaning frontwards. The back of the unit is not in contact with the scanning surface


5.2 - Multi Scan Average

It is recommended to scan the barcode at different heights and average the results in order to give a more accurate overall grading. You can average up to 10 scans of the same barcode. The ISO 15416 standard in its chapter 5.2.5 recommends a minimum of ten scans but the number of scans may be reduced in order to simplify the process of assessment of a large numbers of symbols. The standards, in Annex J2, refer to a methodology based on results achieved on previous print runs of the same symbol. The amount to average over goes from 2 scans to 10 scans as the code goes from a consistently good barcode to a consistently defective barcode. 
Tip: Take 3 scans of the barcode: one at the top, one in the middle and one at the bottom. If the results are good (A or B) and very consistent (same grade each scan) then a 3 scan average is enough, if the result are not so good (C, D or F) and not so consistent (1 grade difference) then use a 5 scan average, if the results are not consistent (results with 2 grade difference or more) then try a 10 scan average.

However, our experience shows that many companies specify a 10 scan average verification in their barcode quality control guidelines, so the 10 scan approach should be favoured if in doubt. 

Comments:
1/ The Axicon verifier software allows you to average over up to 10 scans per barcode. This can be set up from the "Command" screen. The information on individual scans can be stored and displayed at any time, along with the average values.

2/ By only taking a single scan the symbol may be graded lower than it actually is. Taking a single scan through a bad defect will produce a slightly 'unfair' assessment of the symbol, whereas taking several scans will produce a result which is more representative of scanning performance, which of course rarely occurs at just one height within the symbol.

2/ If the number of scans is set to "1",you do not need to clear the screen between scans, but if you average 2 scans or more, then when you have completed scanning for one code, you need to press the delete key to perform a refresh before scanning a new barcode.

5.3 - About the ambient light

When we verify a printed barcode, we look at its physical properties independently from the environment particularly the ambient light. Ambient light at the scanning stage at the retailers cannot be anticipated and should not influence the results at the verification stage. The Axicon verifiers have been built to minimize the influence of the ambient light as much as possible. If properly used, our verifiers cover most of the barcode, thus creating an enclosed area around the barcode. 

However, there is still some minimal access for the ambient light. Also with some packaging, it is impossible to properly cover the scanning area and finally some shiny or even worse non opaque materials leave us with little chance to protect the scanning from the ambient light. So we recommend that you avoid scanning too closely or directly under a source of light, particularly when scanning under sunlight, fluorescent light, high pressure sodium or mercury vapour lamps.


5.4 - Printing a verification report & Saving the data

Once you have verified a barcode, you have several options available. All the results are displayed over the various window of the verifier. You can then decide to ignore the scan and delete the data or you can print a verification report, which provides a summary of the relevant information including the ISO grading for all the required parameters, or you can save the data, which then allows you to open the file at a later stage to review the result on screen or to print a report. When you save the data, the results are saved on your computer or on your chosen media as a .SCN file that can later be opened on any PC/Mac which has the software loaded. When you open the file, all the data is displayed and can be printed off, as if you had just begun verifying the barcode. 

This also enables you to ask for a remote diagnostic immediately (the file can be sent by email). The software can be set up to save all the scans automatically or this can be done manually as you scan. The manual saving allows you to retain only the important verifications and to provide an appropriate file name. 
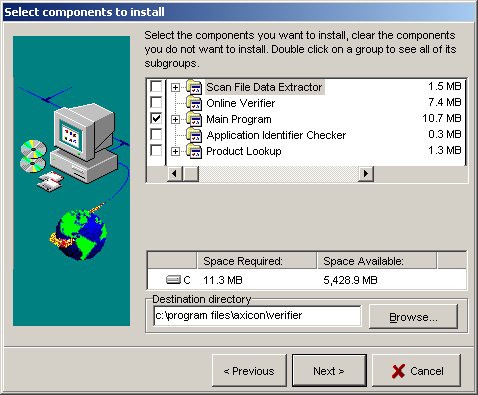
An optional program San File Data Extractor has been developed to be used in conjunction with Axicon PC Verifier. This program allows you to select verification files in a table and is a useful tool for statistical analysis. See Technical Module 4 for more information.

Comments:
1/ For end users who require the choice of customising the verification report, there are a couple of options. A very basic option is to amend the Printer Header field in the Printing tab of the Setup window. However, the option which offers the most flexibility is to extract the required verification data from a csv file. This will involve some further development from the user, but the Axicon Verifier software gives the option to save data automatically in a csv file which can then be the base for editing a customised verification report template. 
2/ To preview the verification report, press on "ALT + SHIFT + F7", the empty "Test" window will pop up, then click on the print option from the "Command" window, click OK and the printout content will appear in the test window.

6. Maintenance 

6.1 - Basic Verifier maintenance

1. Your Axicon verifier is a piece of high precision quality control equipment and should be handled with due care. Try to keep the verifier as much as possible away from dust, as particles could accumulate and affect the verifier optics.

2. Please retain the plastic transit case. Should you need to return the unit to Axicon, this case (plus appropriate packaging) will protect the equipment in transit. 

3. Only use power and data cables supplied by Axicon. Use of non-approved accessories will invalidate the warranty.

4. If the verifier is dropped or subject to similar misuse, the accuracy of the results may be affected. The unit should be returned to Axicon immediately for servicing.

5. As the owner of an Axicon Verifier you are entitled to free software updates for life. The latest copy of the software is always posted on our website (www.axicon.com). Please check the website on a regular basis for the latest upgrades. Software updates can cover minor changes, bug fixes or can include updates to respond to changes in the specifications, so upgrading your Axicon Verifier software on a regular basis is a necessary part of the maintenance procedure of your Axicon verifier. Changes to the software are documented in a text file that can be downloaded from the Download page of our website.

6-2: Calibration Card Maintenance

The Axicon calibration card that was delivered with your equipment is guaranteed for one year, but if handled with care and protected from prolonged direct exposure to light, its properties should not be affected and it should remain accurate. We recommend that you keep the calibration card in a dry and dark environment andin a place accessible to the users that have been trained and authorised to perform the required regular calibrations.

If you believe that the calibration card properties might have deteriorated (bent, fading, visible dirt) or if you are concerned that the guarantee expiry date has expired, we recommend that you order a fresh calibration card from your Axicon reseller.

Comments:

Axicon have always produced calibration cards for their verifiers using their own in-house photoplotting and photographic systems. The purpose of calibration of a printed symbol verifier is to teach it what a reference white reflectance and a reference black reflectance actually are. For this reason it is important to use materials which give as consistent a diffuse reflectance as possible and matt finish photographic papers are ideal for this. The bar code image that is printed on the cards is of less importance in that any scannable bar code will enable the calibration process to work but it is obviously preferable to have appropriate bar code symbols of a reasonable quality.

As from the first quarter of 2006, Axicon has commenced supplying new calibration cards which for the first time are not manufactured in-house. The company that we are using to source these from currently produces the bar code world's standard reference symbols. 
The material used for our new Calibration cards will be identical to the material which they have used to produce the UCC (GS1 US) Conformance Test Cards. Axicon will therefore provide cards of the same quality as those Conformance Test cards in terms of their reflectance consistency and bar code quality.

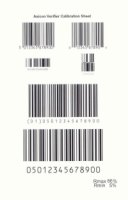
The design has changed from our previous calibration cards and the new card now contains examples of the main GS1 symbologies which the Axicon verifiers can verify including some example RSS bar codes but as mentioned before it does not matter which bar code symbol is used for the calibration process as long as the verifier is actually able to read it. 

6-3 - Recommended Maintenance Procedure: The Factory Recalibration

Axicon equipment is designed and manufactured to the highest specifications and complies with all relevant international standards. Barcode verifiers are precision measuring and testing devices. It is normal practice for all inspection, measuring and test equipment to be regularly checked and recalibrated – and a precision quality control instrument such as a barcode verifier is no exception. 

To ensure that your equipment is working correctly, we recommend that you return your verifier annually to Axicon for servicing / factory recalibration (please note that a factory recalibration is different to the user calibration procedure as explained above). Please contact Axicon (or your approved Axicon reseller) for further details of this service. This service is called a Verifier Calibration & Service (VCAS). On top of a factory calibration, this service also includes a check of the cables and LEDs, cleaning of the unit, supply of a fresh calibration sheet and recertification of the unit.

6-4 - Procedure to follow if you think your Axicon verifier is not working correctly

If you think that your Axicon verifier is faulty and could give inaccurate results then the first step is to contact your Axicon reseller's technical support department and describe in as many details as possible what the problem is. Many problems are often solved at this stage. Depending on the circumstances, here are some general recommendations.

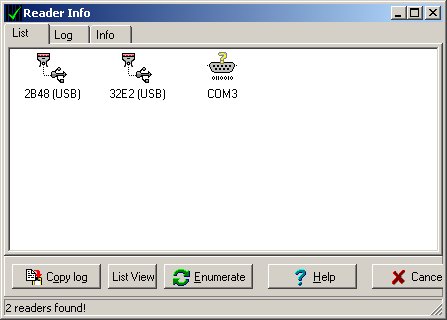
  • You can't get the verifier to work at all after installation: On an USB connection there is a chance that the drivers have not been installed properly. See the installation instruction paragraph for more information. On a serial connection, try activating the verifier from the Reader Info window. If this fails, try another port or even use another PC to check whether the problem relates to the verifier or the initial PC it had been installed on. 

  • The verifier suddenly stops working after previously working correctly for a period of time. Possibly the verifier has not been recognised by the software and you should go into the reader info window to try activating it or perhaps the cable has been damaged or has developed a fault, in which case the unit might work intermittently or not at all. Contact you reseller for a spare cable or try connecting to another PC to identify if the problem is PC related.

  • The verifier works but you think that its accuracy might have been affected. This could happen because the verifier has been mishandled, because it has been used for a long period of time without being factory calibrated, because it has been exposed to dust, dirt or extreme conditions or simply because the results you get do not make sense to you, e.g you get very low grades on the calibration sheet barcodes. Please bear in mind that we often have cases where a user may believe that the verifier is not providing accurate results, when it has actually been the case that it had been badly operated or that the scanned barcode is actually very poor or inconsistent and prone to give inaccurate results. Regardless of whether you are confident or just suspicious that you have an issue with your verifier, you do have ways to check the verifier's accuracy and its conformance to the industry standards.

    To check the accuracy of a verifier, it is important to check it against known values. The calibration card that has been supplied with the equipment is surely the best sample to scan because it will give consistent results, however, other than Rmax and Rmin, no other values of the ISO grading of the codes are known. Unless you have proceeded to an ISO grading on the calibration sheet barcodes when you first received your verifier, just after calibration and kept a copy of the verification report you will have nothing to compare with when you want to check accuracy at a later stage. The ultimate reference remains the Calibration Standard Conformance Test Cards supplied by GS1. These cards have been manufactured under very stringent conditions and their accuracy has been tested individually. The values for a set of measurable ISO/ANSI parameters are specified, and the card can thus be used to check that the results you get using your verifier are within the tolerance values specified in the ISO 15426 Standard.

    Another test you can perform is to check the uniformity of the profile to identify any abnormal fade in one or more of the LEDs or to identify potential dirt spots on the optics of the verifier. To do so, scan a plain white sheet of paper (the back of the calibration card for example). From the Reflectance Profile Window, by ticking the "Display static reflectance" box, you can then check the shape of the reflectance signal you receive from your verifier. It should be in the shape of an horizontal line. If not, then please make a copy of the profile to show it to your Axicon reseller's technical support department. 

    6-5 - Return to base procedure.

    If the verifier needs to be returned to your Axicon reseller for maintenance or repair, please pack the verifier and all cables in the original Axicon carry case. It is also mandatory to include in the package an official Axicon RMA form, with your contact details, the equipment serial number and details on what is wrong or the selected type of service that has to be performed. Prior to this, we recommend that you contact your Axicon reseller to give further notice of the return of the unit and to obtain a quotation for the service required.


DISCLAIMER 
This document is intended as a recommendation of work practices sponsored by Axicon Auto ID Ltd. Whilst this document is believed to contain correct information, neither Axicon Auto ID Ltd nor any of it’s associated companies, nor any of it’s employees, make any warranty, express or implied, or assume any legal responsibility for the accuracy, completeness or usefulness of such information that its use would not infringe privately owned rights. Reference herein to any specific commercial product, process, or service by its trade name, trademark, manufacturer or otherwise, does not necessarily constitute nor imply Axicon Auto ID Ltd endorsement nor recommendation. The views and opinions of authors expressed herein do not necessarily state or reflect those of Axicon Auto ID Ltd.


Go to the top of the page  -  Go Back to the Main Menu